
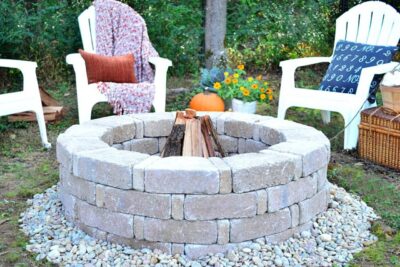
Would you like to add some rustic charm to your backyard? Then you need to learn how to build a stone fire pit and consider building one as a fun and practical DIY project that the whole family can enjoy. Not only will a stone fire pit provide a cozy gathering place for outdoor events, but it can also increase the value of your home.
To build a stone fire pit, choose a flat location that is away from structures and trees and in compliance with local fire regulations. Determine the size and shape of the fire pit based on desired use and available space, and mark the outline with spray paint or stakes and string.
Excavate the area within the marked outline to a depth of about 6-8 inches, install a base layer of gravel or crushed stone, and lay the first layer of stone or brick around the perimeter, using a level to ensure that the stones are evenly placed.
Add additional layers of stone or brick, using an adhesive like mortar or a fire pit liner to hold them in place, and once the fire pit is built to the desired height, add a layer of sand to the bottom. Allow the adhesive to cure according to the manufacturer’s instructions before using the fire pit.
How to select the right location for a stone fire pit
To build a stone fire pit, you will need the following tools:
- Shovel
- Wheelbarrow
- Level
- Spray paint or stakes and string
- Gravel or crushed stone
- Stone or brick
- Mortar or fire pit liner
- Sand
Here are the steps to build a stone fire pit:
- Choose a location for your fire pit that is flat, away from any structures or trees, and in compliance with local fire regulations.
- Determine the size and shape of your fire pit based on your desired use and the space available.
- Mark the outline of the fire pit with spray paint or stakes and string.
- Excavate the area within the marked outline to a depth of about 6-8 inches.
- Install a base layer of gravel or crushed stone to promote drainage.
- Lay the first layer of stone or brick around the perimeter of the pit, using a level to ensure that the stones are evenly placed.
- Continue adding layers of stone or brick, using an adhesive like mortar or fire pit liner to hold them in place.
- Once the fire pit is built to the desired height, add a layer of sand to the bottom to help absorb heat and create a more even surface for burning wood.
- Allow the mortar or adhesive to cure according to the manufacturer’s instructions before using the fire pit.
How to measure and mark out the area for the fire pit
To measure and mark out the area for your fire pit, follow these steps:
- Choose a location for your fire pit that is flat, away from any structures or trees, and in compliance with local fire regulations.
- Determine the size and shape of your fire pit based on your desired use and the space available. A round fire pit is typically more traditional, while a square or rectangular shape may offer more seating space.
- Use a tape measure to determine the dimensions of your fire pit and mark the area with spray paint or stakes and string.
- If using spray paint, make sure to use a variety of colors so that you can easily see the outline of your fire pit.
- If using stakes and string, drive the stakes into the ground along the perimeter of the marked area and tie the string between the stakes to create the outline.
- Double-check the measurements and placement to ensure that the fire pit will fit in the designated area and meet any local fire regulations.
- Once the area is marked out, you can begin excavating and building the fire pit according to the steps outlined above.
How to excavate and level the ground for the fire pit
Excavating and leveling the ground for your fire pit is an important step in the building process. It helps to create a stable foundation for your fire pit and ensures that it sits evenly on the ground.
Here are the steps to excavate and level the ground for your fire pit:
- Begin by clearing away any debris or plants from the marked area.
- Using a shovel, dig out the area within the marked outline to a depth of about 6-8 inches.
- If the ground is uneven, use the shovel to level it out as much as possible.
- Use a wheelbarrow to remove any excess dirt or debris from the excavation site.
- Once the ground is cleared and leveled, you can begin installing a base layer of gravel or crushed stone to promote drainage.
- Use a level to ensure that the base layer is even and properly graded, adding or removing material as needed.
- Once the base layer is complete, you can begin laying the first layer of stone or brick around the perimeter of the pit.
How to lay a foundation for the fire pit using gravel or concrete
Laying a foundation for your fire pit using gravel or concrete is an important step in the building process. It helps to create a stable and level base for your fire pit and promotes proper drainage to prevent water from pooling under the pit.
Here are the steps to lay a foundation for your fire pit using gravel or concrete:
- Begin by excavating the area within the marked outline to a depth of about 6-8 inches.
- Use a shovel to level the ground as much as possible.
- If using gravel as the foundation, spread a layer of gravel or crushed stone over the excavated area. The depth of the layer should be at least 2-3 inches.
- Use a level to ensure that the gravel is evenly distributed and properly graded, adding or removing material as needed.
- If using concrete as the foundation, mix the concrete according to the manufacturer’s instructions and pour it into the excavated area.
- Use a trowel or other flat tool to smooth the surface of the concrete and ensure that it is level.
- Allow the gravel or concrete to set according to the manufacturer’s instructions before proceeding with the next step of building the fire pit.
How to choose and prepare the stones for the fire pit walls
Choosing and preparing the stones for the walls of your fire pit is an important step in the building process. It will affect the overall appearance and durability of your fire pit.
Here are some factors to consider when choosing and preparing the stones for your fire pit walls:
- Select stones that are durable and able to withstand high temperatures. Good options include natural stone, brick, or concrete pavers.
- Consider the size and shape of the stones in relation to the overall design of your fire pit. Larger stones may be more difficult to work with, but they can create a more impressive visual impact.
- If using natural stone, make sure to select stones that are relatively flat and have a consistent thickness. Avoid using stones that are too thin or have jagged edges, as they may be prone to breaking or cracking under heat.
- If using brick or concrete pavers, make sure to select ones that are designed for use in fire pits.
- Before installing the stones, clean them thoroughly to remove any dirt or debris that may affect their placement or appearance.
- If necessary, cut the stones to fit the desired shape and size of your fire pit using a saw or masonry chisel.
- Arrange the stones in a dry run to ensure that they fit properly and create the desired look before installing them.
By carefully selecting and preparing the stones for your fire pit walls, you can create a durable and visually appealing feature for your backyard.
How to lay the first layer of stones for the fire pit walls
- Laying the first layer of stones for the walls of your fire pit is an important step in the building process. It establishes the base of the fire pit and sets the foundation for the rest of the structure. Here are the steps to lay the first layer of stones for your fire pit walls:
- Begin by spreading a layer of gravel or crushed stone over the base of the fire pit. The depth of the layer should be at least 2-3 inches.
- Use a level to ensure that the gravel is evenly distributed and properly graded, adding or removing material as needed.
- If using mortar or a fire pit liner to hold the stones in place, mix the material according to the manufacturer’s instructions.
- Starting at one end of the fire pit, lay the first layer of stones or bricks around the perimeter of the pit.
- Use a level to ensure that the stones are evenly placed and aligned with one another.
- If using mortar, spread a layer of the mixture onto the base of the fire pit and place the stones or bricks onto the wet mortar. If using a fire pit liner, place the liner onto the base of the fire pit and lay the stones or bricks onto the liner.
- Use a trowel or other flat tool to smooth the surface of the mortar or liner and ensure that it is level.
- Continue adding stones or bricks to the first layer, leaving small gaps between them for expansion and contraction.
- Once the first layer is complete, allow the mortar or liner to set according to the manufacturer’s instructions before proceeding with the next layer.
How to stack and mortar the stones for the fire pit walls
Stacking and mortaring the stones for the walls of your fire pit is a process that involves layering the stones and using a bonding material, such as mortar, to hold them in place. This helps to create a strong and stable structure for your fire pit.
Here are the steps to stack and mortar the stones for your fire pit walls:
- Begin by mixing the mortar according to the manufacturer’s instructions.
- Starting at one end of the fire pit, spread a layer of mortar onto the base of the fire pit and place the first layer of stones or bricks onto the wet mortar.
- Use a level to ensure that the stones are evenly placed and aligned with one another.
- Once the first layer is complete, spread a layer of mortar onto the top of the stones and lay the second layer of stones or bricks onto the wet mortar.
- Continue stacking and mortar the stones or bricks in this manner, using a level to ensure that each layer is even and aligned with the previous one.
- Leave small gaps between the stones to allow for expansion and contraction.
- Once the desired height of the fire pit is reached, smooth the surface of the mortar with a trowel or other flat tool.
- Allow the mortar to set according to the manufacturer’s instructions before using the fire pit.
- By stacking and mortaring the stones for your fire pit walls, you can create a strong and durable structure that will last for years to come.
How to create a circular or square shape for the fire pit
To create a circular or square shape for your fire pit, follow these steps:
- Begin by marking out the area for your fire pit as described in previous answers.
- If you want to create a circular fire pit, use a circular saw or masonry chisel to cut the stones or bricks to fit the desired radius of the pit.
- If you want to create a square or rectangular fire pit, use a saw or masonry chisel to cut the stones or bricks to fit the desired dimensions of the pit.
- As you lay each layer of stones or bricks, use a level to ensure that they are evenly placed and aligned with one another.
- If using mortar or a fire pit liner to hold the stones in place, make sure to smooth the surface of the bonding material with a trowel or other flat tool after each layer is complete.
- Once the desired shape and height of the fire pit are reached, allow the mortar or liner to set according to the manufacturer’s instructions before using the fire pit.
- By cutting and placing the stones or bricks carefully, you can create a circular or square shape for your fire pit.
How to create a raised or sunken fire pit design
A raised or sunken fire pit design can add visual interest and depth to your backyard. Here are the steps to create a raised or sunken fire pit design:
- Begin by marking out the area for your fire pit as described in previous answers.
- If creating a raised fire pit, excavate the area within the marked outline to a depth that is slightly deeper than the desired height of the fire pit walls.
- If creating a sunken fire pit, excavate the area within the marked outline to a depth that is slightly shallower than the desired height of the fire pit walls.
- Lay a base layer of gravel or crushed stone to promote drainage.
- Begin stacking and mortaring the stones or bricks as described in previous answers, using a level to ensure that they are evenly placed and aligned with one another.
- If creating a raised fire pit, build up the walls of the fire pit to the desired height. If creating a sunken fire pit, build the walls of the fire pit to the desired height and then continue excavating around the outside of the walls to create the sunken effect.
- If using mortar or a fire pit liner to hold the stones in place, make sure to smooth the surface of the bonding material with a trowel or other flat tool after each layer is complete.
- Once the desired shape and height of the fire pit are reached, allow the mortar or liner to set according to the manufacturer’s instructions before using the fire pit.
- By adjusting the depth of the excavation and building the walls of the fire pit to the desired height, you can create a raised or sunken design for your fire pit.
How to add drainage to the fire pit to prevent water accumulation
To add drainage to your fire pit and prevent water accumulation, follow these steps:
- Begin by excavating the area within the marked outline to the desired depth for your fire pit.
- Install a layer of gravel or crushed stone at the bottom of the excavation. The depth of the layer should be at least 2-3 inches.
- Use a level to ensure that the gravel is evenly distributed and properly graded, adding or removing material as needed.
- As you lay each layer of stones or bricks, leave small gaps between them to allow for proper drainage.
- If using mortar or a fire pit liner to hold the stones in place, make sure to smooth the surface of the bonding material with a trowel or other flat tool after each layer is complete.
- Once the desired height of the fire pit is reached, add a layer of sand to the bottom of the pit to help absorb heat and create a more even surface for burning wood.
- To further improve drainage, consider installing a drain pipe or French drain around the perimeter of the fire pit. This will help to channel water away from the pit and prevent pooling.
- Allow the mortar or liner to set according to the manufacturer’s instructions before using the fire pit.
By adding drainage to your fire pit and properly grading the base, you can help prevent water accumulation and ensure that your fire pit stays dry and functional.
How to maintain and clean the stone fire pit
To maintain and clean your stone fire pit, follow these steps:
- After each use, allow the fire pit to cool completely before cleaning it.
- Use a metal or wire brush to remove any excess ash or debris from the bottom of the fire pit.
- Use a hose or bucket of water to rinse the inside of the fire pit, making sure to remove any remaining ash or debris.
- If necessary, use a mild detergent or soap and a scrub brush to remove any stubborn stains or grime from the stones.
- Rinse the fire pit thoroughly with water to remove any soap or detergent residue.
- If desired, use a sealant specifically designed for fire pits to protect the stones from stains and water damage.
- During periods of non-use, cover the fire pit with a waterproof cover to protect it from the elements.
- Regularly inspect the fire pit for any cracks or damage and make repairs as necessary.
By following these maintenance and cleaning steps, you can help keep your stone fire pit in good working condition and extend its lifespan.
Recommended:
- How To Make A Fire Pit In The Ground
- How To Build A Fire Pit With Pavers
- How To Start A Fire In A Fire Pit
- How To Put Out A Fire Pit
How to troubleshoot common issues with stone fire pits
Troubleshooting common issues with stone fire pits can help you keep your fire pit in good working condition and ensure that it is safe to use.
Here are some common issues that may arise with stone fire pits and how to troubleshoot them:
1. Cracking or chipping of stones
If the stones in your fire pit are cracking or chipping, it may be due to heat exposure or improper installation. To prevent this issue, choose durable stones that are able to withstand high temperatures and make sure to properly stack and mortar the stones according to the manufacturer’s instructions.
2. Sinking or settling of stones
If the stones in your fire pit are sinking or settling, it may be due to improper drainage or a lack of a solid foundation. To prevent this issue, make sure to install a layer of gravel or crushed stone at the bottom of the pit to promote drainage and use a level to ensure that the base is properly graded.
3. Water accumulation
If water is accumulating in your fire pit, it may be due to a lack of drainage or a low-lying area in your backyard. To prevent this issue, make sure to properly grade the base of the fire pit and consider installing a drain pipe or French drain around the perimeter to channel water away from the pit.
4. Structural instability
If your fire pit is experiencing structural instability, it may be due to a lack of a solid foundation, improper stacking of stones, or the use of weak or inappropriate bonding materials.
To prevent this issue, make sure to properly excavate and grade the base of the fire pit, stack, and mortar the stones according to the manufacturer’s instructions, and choose durable and high-quality bonding materials.
If you notice any cracks or other signs of structural instability, stop using the fire pit immediately and consult a professional for repair or reconstruction.
By troubleshooting common issues with stone fire pits, you can help ensure that your fire pit is safe and functional for years to come.
Conclusion
Building a stone fire pit is a fun and practical DIY project that can add rustic charm and value to your home. With the right tools and materials, and by following the right steps on how to build a stone fire pit, you can easily build a stone fire pit that will provide a cozy gathering place for outdoor events.
To ensure the success of your project, be sure to choose a suitable location, excavate and level the ground, lay a solid foundation, select and prepare the stones, and stack and mortar the stones according to the manufacturer’s instructions. By properly building and maintaining your stone fire pit, you can enjoy it for years to come.